How to Protect Your Brand From Competitors on Paid Search
-
DESCRIPTION
Appear when customers and prospects are searching for your brand on Google with this playbook.
-
CHANNEL
Google Ads
-
OBJECTIVE
Pipeline Generation
Hey I’m Silvio Perez, Head of Product Innovation at Metadata.
There’s nothing like seeing your competitors bid all over your branded terms.
For better or for worse Google allows this activity to happen.
If you’re not going on the offensive and protecting your brand then competitors could be taking advantage of this opportunity and appearing in front of your customers/prospects.
Why consider running Branded Search campaigns?
- Protect your brand against competitors bidding on your name and appear in the top spots of Google for your customers/prospects searching.
- Direct branded traffic to a dedicated landing page to yield a higher conversion rates vs just your homepage from your organic listing.
- Lower CPCs due to having a higher quality score for your brand terms in comparison to your competitors paying higher costs.
Here’s a quick rundown on how this works.
How it works
- Create a list of branded keywords to target such as “brand name”, “brand name alternatives”, “brand pricing”.
- Write ad copy that highlights your brand and value proposition.
- Direct prospects researching your brand to a dedicated conversion page such as requesting a demo, starting a free trial, and viewing an on-demand product tour.
The Playbook
Build your branded keyword list and exclude customers.
In Metadata, head over to Library → Google Assets → Positive Keywords → Add New Keywords
Complete the following:
- Enter your desired branded keywords you’d like to target.
- Recommend:
- brand name
- brand alternatives
- brand pricing
- brand reviews
Replace ‘brand name’ with your company name.
- For example:
- metadata
- metadata alternatives
- metadata pricing
- metadata reviews
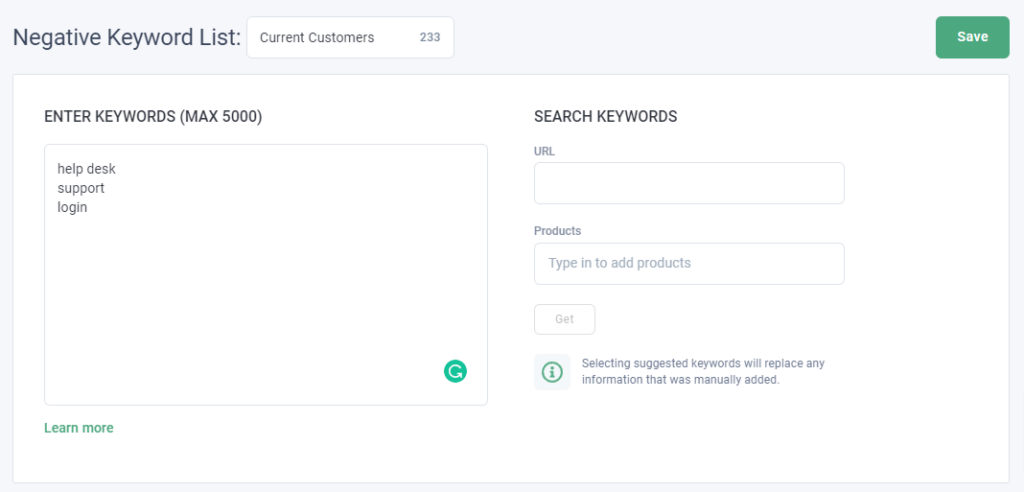
- With your branded keyword in place create a Negative Keyword List and exclude help desk, support, and login (Library → Google Assets → Negative Keywords) so you’re not showing up for customer related searches.
- You can also exclude customers via SFDC Dynamic Contact audiences if you have a large enough contact list to meet Google’s minimum requirements of 1,000 users.

Create your paid search budget group (if applicable)
Head over to Campaigns → Budget Groups → Add New Group
How you set your group is completely optional based on your budget and goals.
If you want to guarantee that a certain amount of spend is allocated towards a specific channel then create its own dedicated group as outlined below.
- For example:
- Group Name = Paid Search
- Goal = Lead Generation

- If you don’t mind your budget is shared across different channels that support the same goal create one group as outlined below.
- For example:
- Group Name = Demo Request
- Goal = Lead Generation

If you already have a group created that you’d like to use then skip this step.
Build your landing page offer you’re driving branded traffic towards.
Head over to Library → Offers → Add New Offer → Landing Page for Lead Generation
Enter your Landing Page URL (required) and Thank You Page URL (optional).
If you don’t have a thank you page, no worries! Just enter your landing page URL again.
(You’ll still be able to capture leads in Metadata without a Thank You Page URL).
Select ‘Retrieve Form Fields’ and map your fields accordingly.
IMPORTANT: email is the only required field but if mapping is incorrect can cause lead capture issues.
For more information on creating landing page offers read this article.
Here’s an example landing page for Metadata: https://metadata.io/platform/
Write your branded search ad copy with responsive search ads.
Head over to Library → Ads → Add New Ad → Google Ads
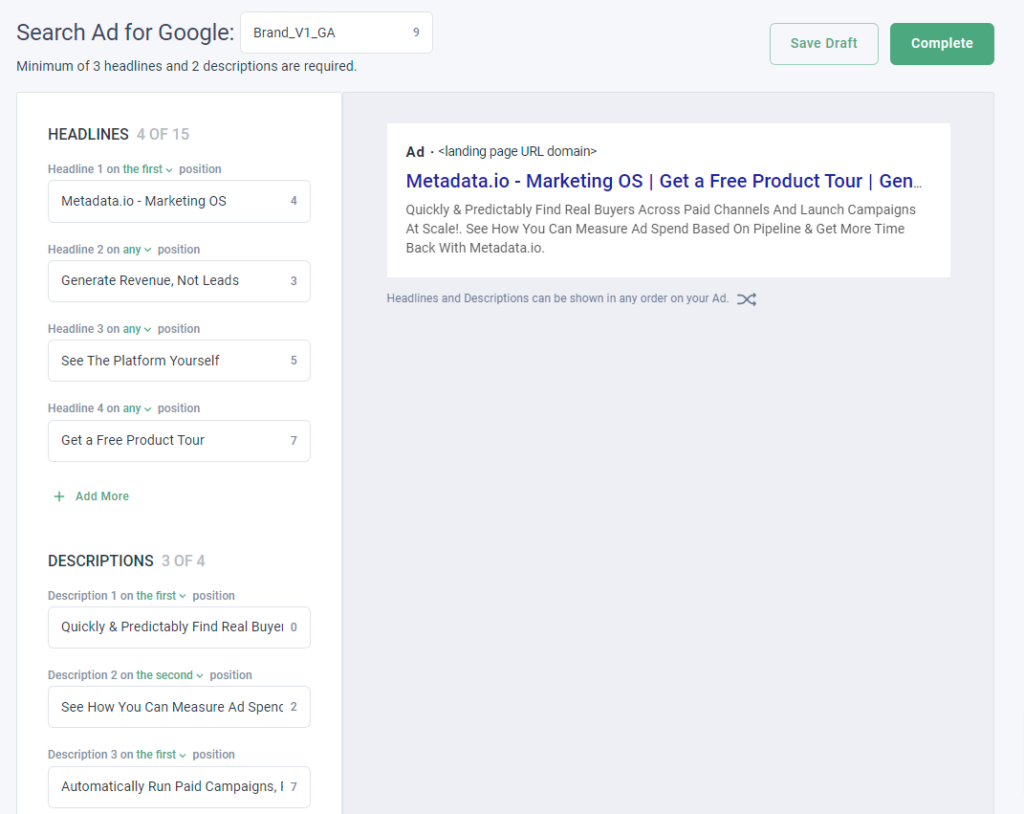
Enter your competitive ad copy for minimum 3 headlines and 2 descriptions.
We recommend the following:
- Pin your brand name in position 1 for awareness.
- Highlight your unique differentiation in position 2.
- Metadata example = Generate Revenue, Not Leads
- Title case the beginning of each letter to help improve CTR, example:
- Title case = Metadata Is a Marketing Operating System Used By B2B Marketers
- Lower case = Metadata is a marketing operating system used by B2B marketers
- Pin and leverage as many positions possible to allow Google to rotate your ad copy but also control legibility with pins (if your ad isn’t readable, no one will click).
- 1 RSA (responsive search ad) should suffice as it’s the equivalent of 5 expanded text ads when leveraging all 15 headlines and 4 descriptions.
Here’s an example branded RSA of Metadata:
Setup and launch your branded search campaigns!
Head over to Campaigns → Add New Campaign → Lead Generation
(You can do brand awareness, but we recommend Lead Generation for search campaigns).
Campaign Name:
Enter your campaign name, here’s a simple naming convention you can use:
- Region | Targeting | Channel | Match Type | Offer
- For example: NA | Brand | Google Ads | Exact | Demo

Campaign Ingredients (Keywords/Ads/Offers):
You’ll want to have a strong message match with relevant keywords, ads, and landing page to yield higher quality scores.
- Enable Google Ads and select ‘Include Keywords’ to add all the brand keywords you created in Step 1 (also recommend excluding relevant negative keywords).
- Once you’ve added all your keywords select ‘Add Ad’ and choose your relevant brand ad copy for this competitor you created in Step 4.
- Finally once you’ve added all your ads select ‘Add Offer’ and choose your dedicated conversion landing page.
- Campaign Settings
- MA List for Leads = 100% optional
- Native Bidding = recommend Maximize Conversions to start (can adjust post launch)
- Daily Budget Per Experiment = $25-$50/day per experiment
- Location = your target location (example = United States/Canada)
- Keyword Match Type = recommend Exact or Phrase
- Schedule = recommend Monday – Friday (can adjust post launch if needed)
- Language = recommend one language per campaign (example = English)
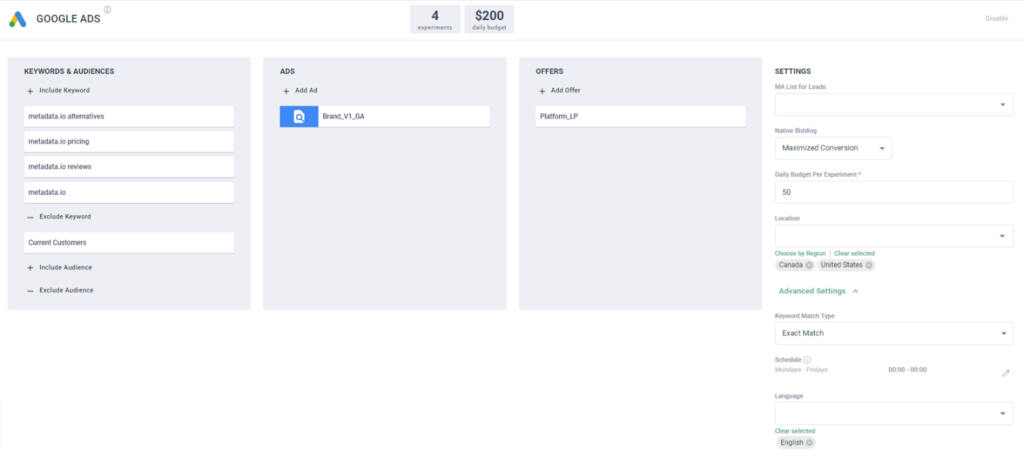
- Once you’ve finalized your settings and campaign ingredients, launch your campaign!
P.S: If you want to test your multiple match types just duplicate your original campaign and make those adjustments.


